|
|
||||
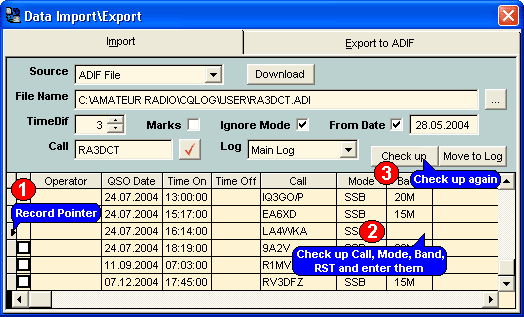
| 1. | Specify the log-program or ADIF File from the Source drop-down menu for data import.
|
|
|
| 2. | Use the |
|
|
| 3. | The data import from this file into this dialog box by clicking Import button. Thus validation of a data format which are used CQLog will be fulfilled. If the error in a data format will be searched, the Import button will be replaced with the Check up button and a record pointer will be placed on record, which has returned an error. In this case, edit the data in the grid and check up of the data correctness by pressing the Check up button. At a correct data format the Move to Log button becomes accessible.
|
|
|

|
|
|
| If it is necessary to fill all empty RS Sent or RS Rcvd values, click the right mouse button in an appropriate column.
|
|
|
| 4. | Move the data from this dialog box into main logging window by pressing the Move to Log button.
|
|
|
|
|
| At data import or export the question on choice of a code page will be given to you. This question is actual while the data translating from a DOS format into a Windows format. For example, DOS files code pages 850 (International MS-DOS), 866 (Russian) etc are used, but Windows files code pages 1250, 1251 accordingly etc are used.
|
|
|
|
|
| The CHM file was converted to HTML by chm2web software. |